![]()
How To Create A Coming Soon Page For Your WordPress Website
You’ve bought your domain and web hosting, installed WordPress to your website, and with great excitement, you check your small business’s home page and it is, well, UGLY!
Now what? There is still a ton of work to do on your website before it will be ready to launch. And in the meantime, what will your clients and website visitors see?
Your solution – create a professional coming soon page that your clients will see while you work on your website behind the scenes.
Luckily, with WordPress, it is easy to add a coming soon page to your website!
And the best part is that while your visitors and clients will be taken to the coming soon page, you will be able to build your website in the background without anyone seeing it – you will be able to keep every aspect of your website private until you are ready to launch it!
Create A Coming Soon Page With A WordPress Plugin
The easiest way to add a coming soon page to your website is by using a plugin.
In my previous article, How To Add A Plugin To WordPress (Beginners Guide), we went over how to add a plugin to WordPress. In that article, we installed a plugin called, “CMP – Coming Soon & Maintenance Plugin”. This is the plugin we will use to set up our WordPress coming soon page.
How To Add The Coming Soon Page Plugin To Your Website
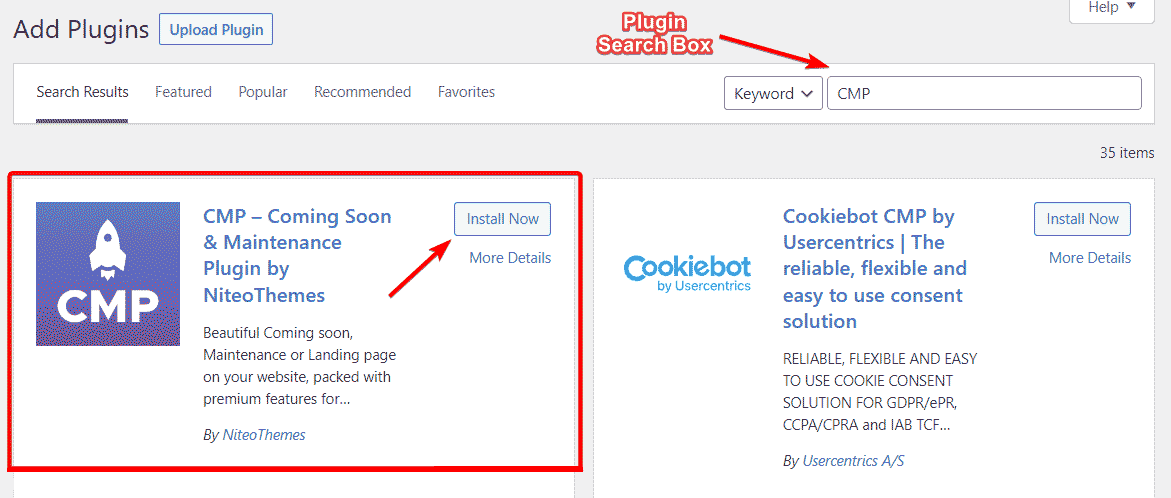
Before we begin, you need to install the “CMP – Coming Soon & Maintenance Plugin” to your website.
- Click on the Plugins menu
- Click “Add New”
- Type “CMP” into the search box
- The CMP Coming Soon plugin should be the first plugin displayed
- Click “Install”
- Click “Activate”
If you are new to WordPress and you aren’t sure how to install the plugin, you can follow along with my step-by-step guide.
Now that the plugin is installed, let’s begin!
Build Your Coming Soon Page
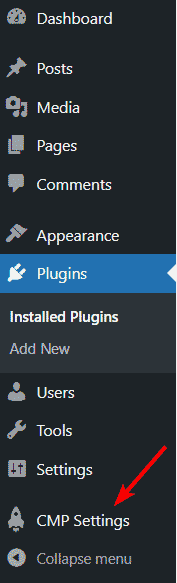
On the WordPress admin menu, you will see a new menu item – CMP Settings. Click here to open the CMP plugin options.
When the CMP settings page is opened, you will be taken to the “General Settings” page. Here you will see a button that will allow you to enable and disable the coming soon page as well as options that allow you to choose whether you would like to use a coming soon page, maintenance mode page, or a page redirect.
Select the “Coming Soon & Landing Page” option. Click “Save All Changes”.
Note: Any blurred-out customization blocks within the plugin options are for paid themes.
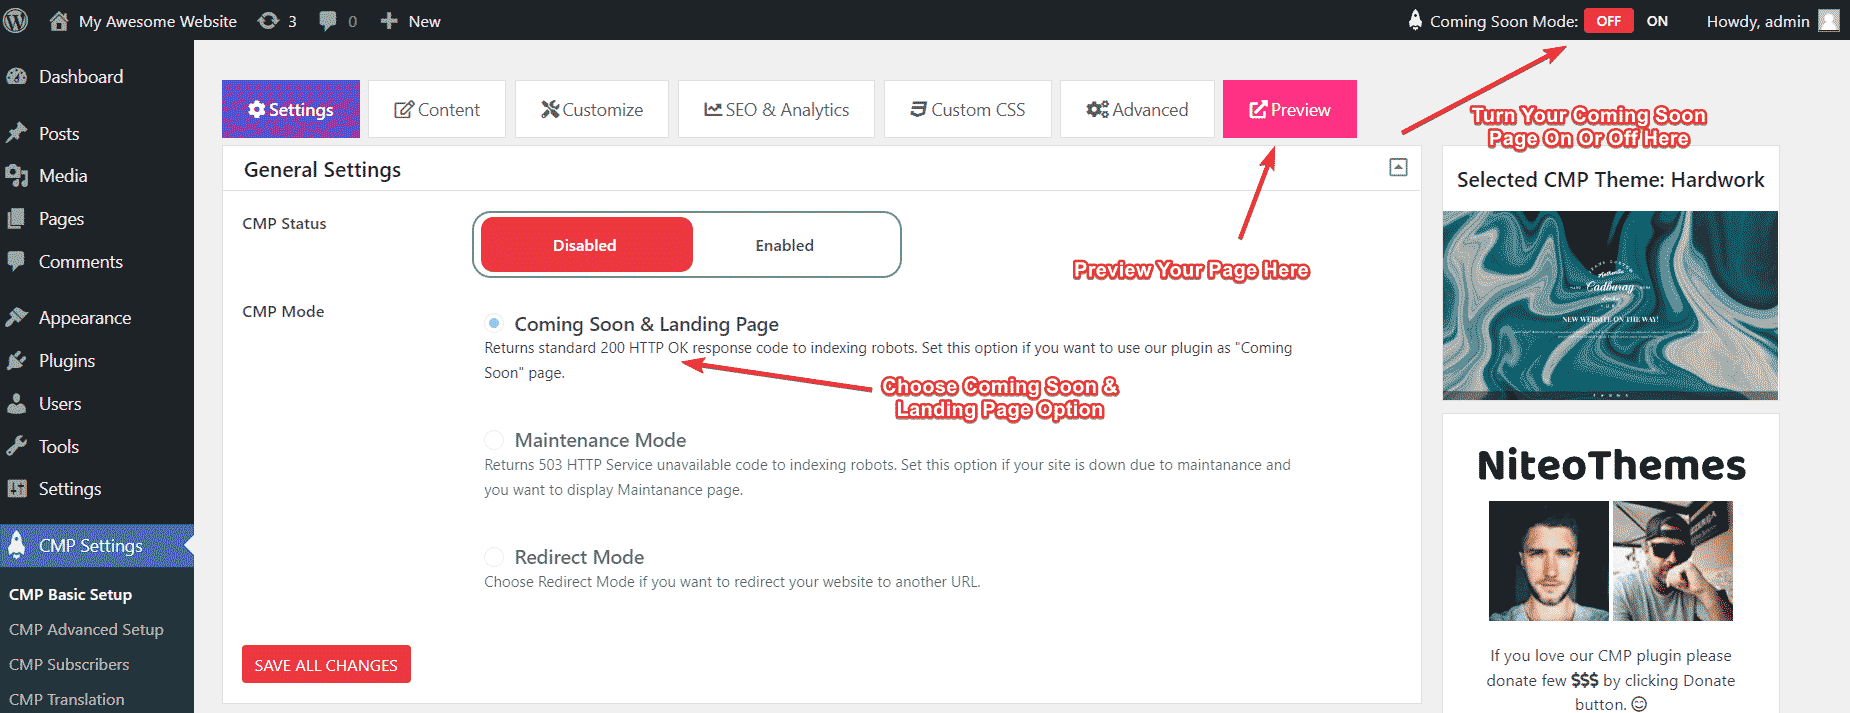
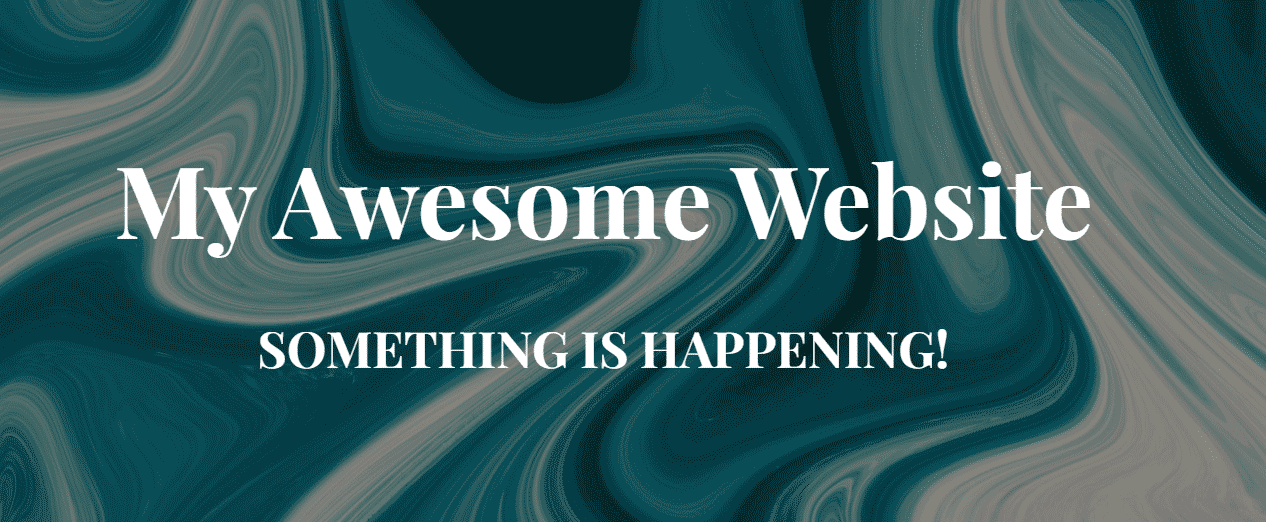
You now have a very basic coming soon page! If you would like to see what it looks like, click the “Preview” button.
Your page should look something like this:
Customize Your Coming Soon Page
The CMP coming soon page plugin comes with a few ready-made coming soon pages. These are great at giving you a head start when building and customizing your coming soon page.
Scroll down the page until you get to a section called “Available Themes”. Here you will see that there are three themes available for free – Hardwork (which is the default theme), Construct, and Countdown.
To preview what a theme will look like, simply hover your mouse over the themes you like and a preview button will be displayed.
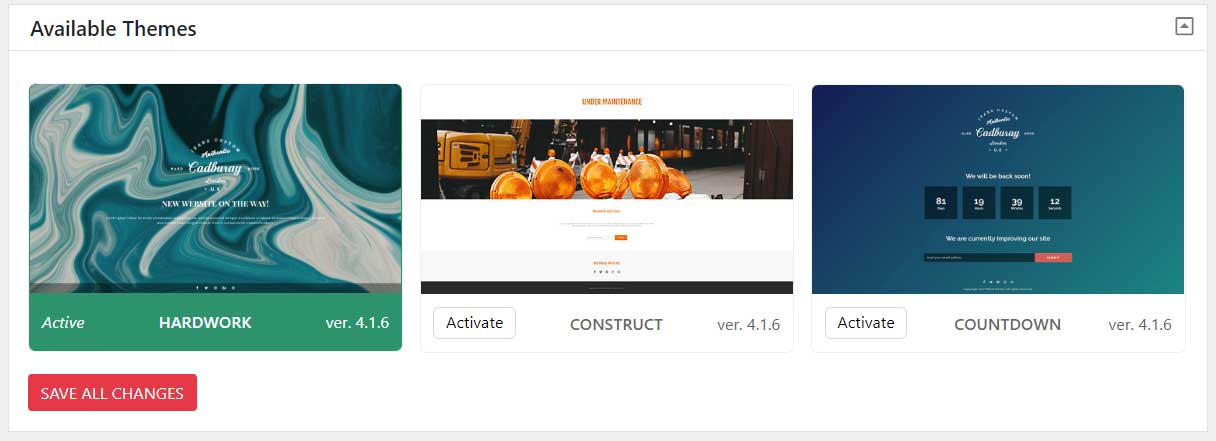
To use any of these themes, simply click “Activate” and “Save All Changes”. You can then click “Preview” to see what your coming soon page looks like. Don’t worry if you aren’t happy with it, we will be customizing it next.
Note: If you scroll further down the page you will get your section called “Download More CMP themes”. In this section, you will be able to buy and install ready-made coming soon page themes.
Select The Theme
For this example, we will be using the Countdown theme. Click the “Activate” button underneath the theme image and the theme will automatically be activated.
Content Menu
The CMP coming soon pages plugin offers lots of great customization options! In this tutorial, we will go over the basics to get you up and running as quickly and easily as possible. However, feel free to play around, there are lots of cool options to explore!
Click the “Content” button at the top of the CMP settings page.
Logo
In the logo section, you can choose to either have a text logo, a graphic logo or you can turn the logo option off.
Because we want to get up and running as quickly as possible, we will disable the logo for this example.
Tip! After each change you make, remember to click “Save All Changes”. You can then click on the preview button to see what your coming soon page looks like.
Main Content
The “Main Content” section is where you will enter all the text you would like to include on your coming soon page.
You will see a “Heading” box and a “Message” box.
Enter the text that you would like to use in these boxes.

Remember to click “Save All Changes”.
Graphic Background
In the “Graphic Background” section, you will be able to choose what type of background you would like for your coming soon page.
There are lots of options here including:
- Default media – The default image used in the theme you chose.
- Custom Images – Upload your own images.
- Unsplash Library – Use public domain images.
- Video – Use a YouTube video or upload your own video.
- Graphic Pattern – Use pre-installed background patterns or upload your own.
- Solid Color
- Gradient Color
Clicking on any of these options will open up additional options that will allow you to customize the coming soon page background.
For our example, we will use the “Unsplash Library” option so that we don’t have to worry about uploading any of our own images just yet.
What Is Unsplash?
Unsplash is a massive library of high-quality stock images that are free to use for both personal and commercial use.
Unsplash is a website dedicated to proprietary stock photography. Since 2021, it has been owned by Getty Images. The website claims over 265,000 contributing photographers and generates more than 16 billion photo impressions per month on their growing library of over 3.48 million photos. Unsplash has been cited as one of the world’s leading photography websites by Forbes, Design Hub, CNET, Medium and The Next Web.
Wikipedia
When you select the Unsplash Library option, you will see “Choose Unsplash Feed”. Click the drop-down and select “Random Photo”.
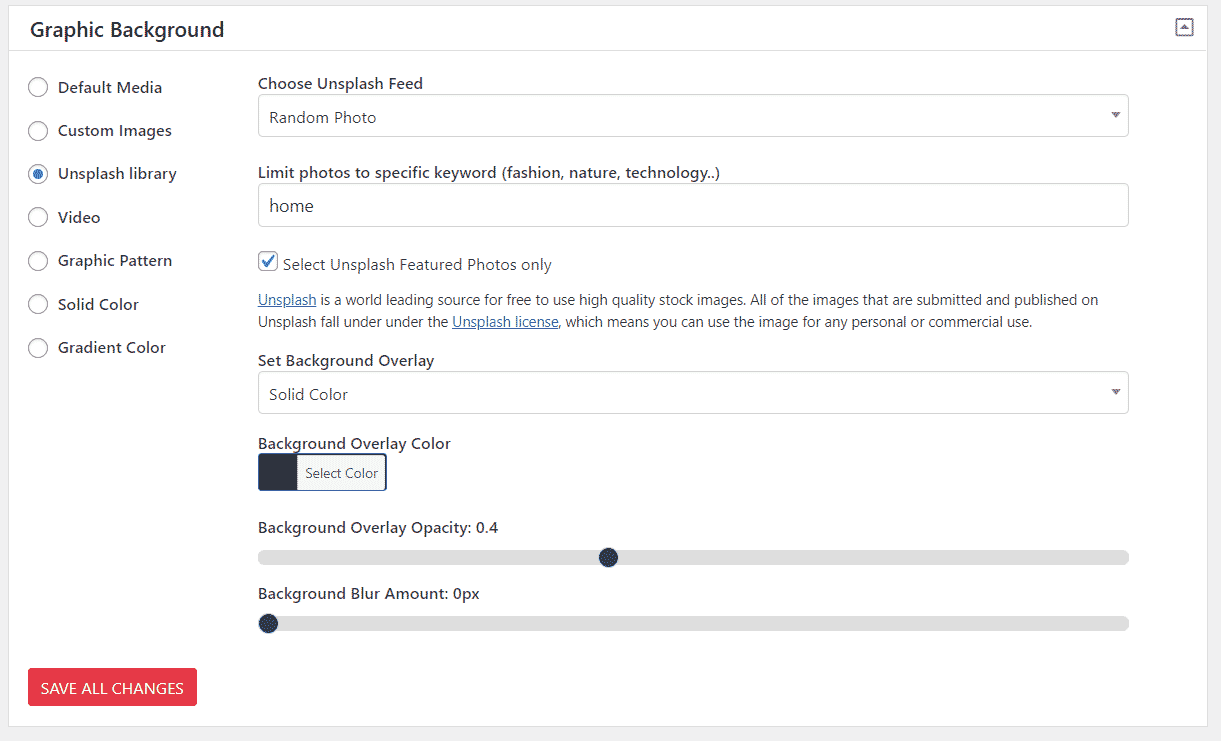
In the next text box, you can specify what category you would like photos to be displayed from. For example, if you have a home renovation small business, you could type “home” here and only images of homes will be pulled from the Unsplash image library.
The next text box allows you to select only featured photos in the Unsplash library. If you select this option, then only the featured images from the library will be displayed. If your small business is in an unusual or small niche you may need to turn this off so that you have a good selection of photos that are displayed.
The next couple of options allow you to add a background overlay color to the photos. This is handy especially if you want your text to stand out. You can adjust these settings to suit your design.
Login Icon
By default, the Login Icon option is set to Disabled. You would use this option later on if you would like people to be able to log in to your website directly from the coming soon page.
Countdown Timer Setup
Here you will be able to choose whether you would like a countdown timer displayed. If you enable this option you will be able to set a date and time for the timer as well as specify what will happen when the timer expires.
For example, you can set your timer to expire on a specific date and then specify that your website must go live on that date. This will happen automatically without you manually needing to disable the plugin.
For our example, we will disable the timer.
Subscribe Form
The CMP coming soon page plugin comes with a really nifty feature that is really great if you would like to collect email addresses before you actually launch your website.
Simply select the “Enable In Page Subscribe Form” checkbox to enable the subscribe form. To keep things simple we will use the default “CMP Subscribe” option.
There are a few other options available here but we will leave all of these on their default settings for now. When you are done, save all your changes.
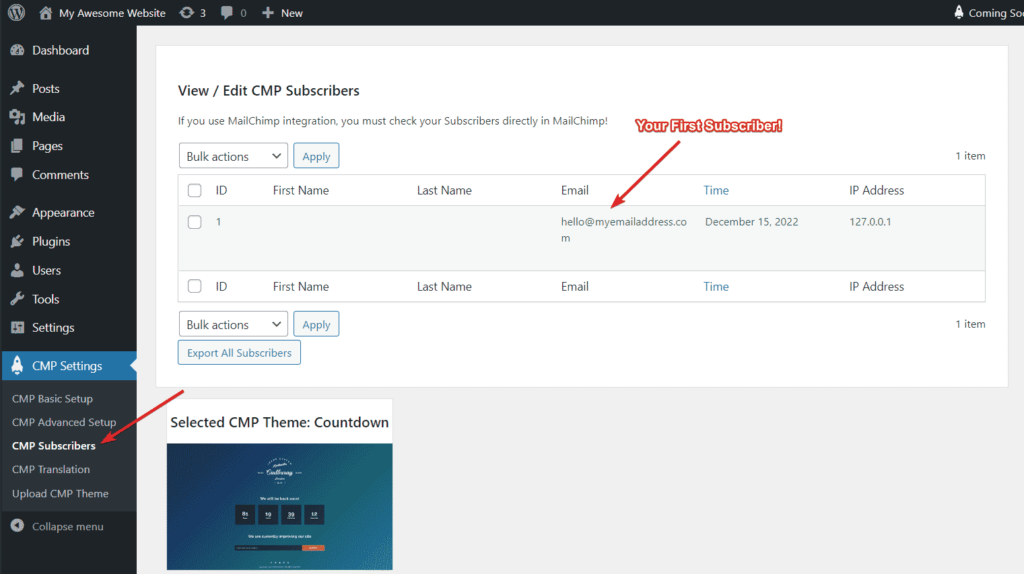
To test whether the subscribe form is working, you can click the Preview button. When the coming soon page opens, you should see all the changes you have made to the page so far, including your custom heading, message, Unsplash background photos, and the email subscription form.
Go ahead and enter an email address into the subscription form.
When you click Submit, a thank you message will pop up saying that the email sign-up was successful.
You can check whether the email was saved successfully by going to the CMP Settings menu and clicking on CMP Subscribers.
Social Media
In the “Social Media” section you will be able to choose whether you would like to display any social media icons. This is great if you have established social media accounts or if you are just starting out.
Simply click on a social media icon to enable it – when an item is enabled, the icon color will change and a section will open up underneath where you will be able to enter your social media URLs.
You can also specify what order you would like the icons in.
Underneath that there is a “Social Icons Location” option. Here you can choose whether you would like your social media icons to be in the footer or below the content.
For our example, I chose Facebook, Instagram, and Pinterest.

Footer Content
The last option on this page allows you to add any text you would like included in the footer section of the coming soon page. In this example, I simply included a copyright notice.
Customize Menu
When you click on the “Customize” menu, you will be able to specify what colors and fonts you would like to use for your coming soon page.
In the “Customize Colors” block you will see an option for “Active Color“. This is the color that is used for your subscribe form button.
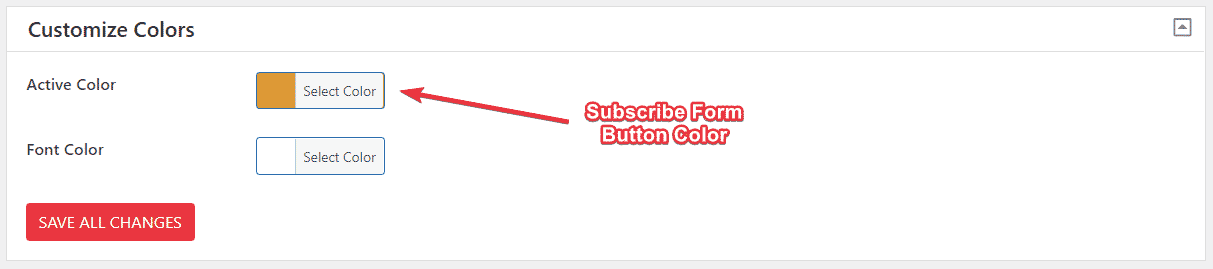
Once you have customized your coming soon page fonts and colors remember to save all changes. By now your coming soon page should be coming along nicely!
SEO & Analytics Menu
We are almost done! The SEO and Analytics menu allows you to change your site title and site description – search engines will see these details when they visit your website when the coming soon page is active.
Both these blocks should already be filled in with the details that you added when you first installed WordPress. However, you can change these details if you would like to.
You can leave all the other options on their default settings.
Congratulations! You have just created a coming soon page for your WordPress website!
Feel free to go back to tweak and play with any of the settings.
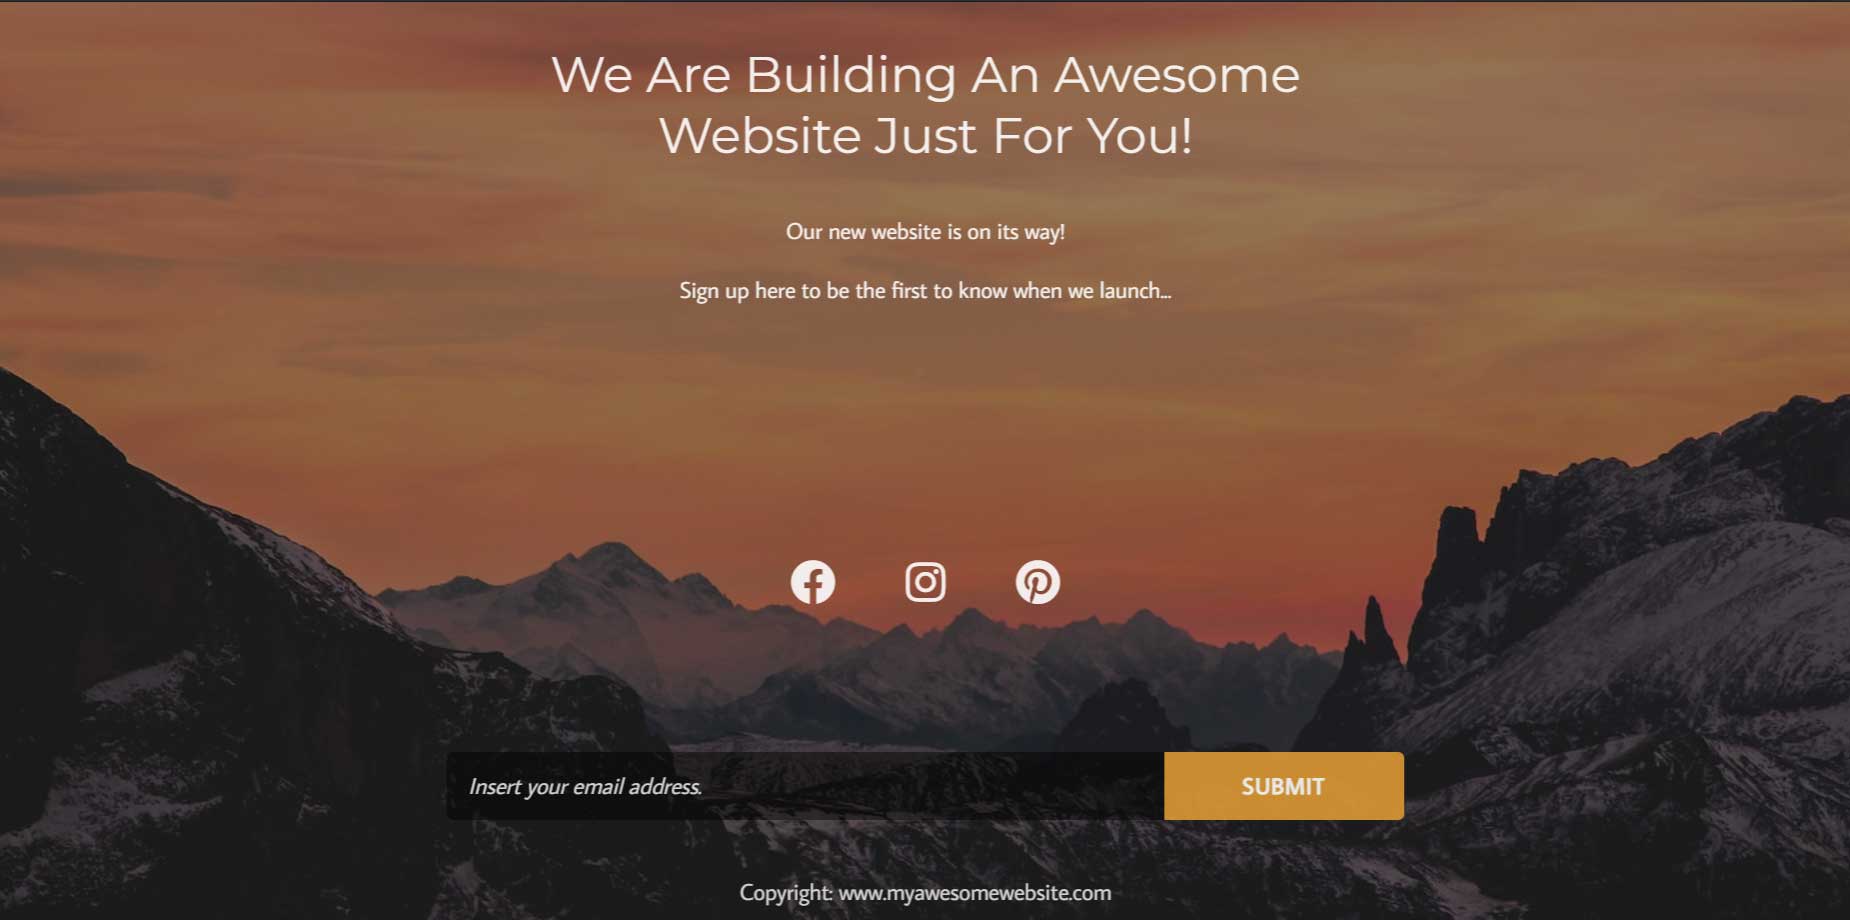
This is what my new coming soon page looks like!
Activate Your Coming Soon Page
When you are happy with your coming soon page design, you can go ahead and activate it using either the big buttons in the settings menu, or the On / Off toggle in the Coming Soon Mode menu item at the top right of the page.
Note that you won’t see the coming soon page if you are logged into the WordPress admin panel. You will need to log out in order to see your coming soon page in action.
Give it a try! Log out of the WordPress admin panel. You should now see your coming soon page. This is what any visitors to your website will see.
Log into the WordPress admin panel again and now you will see your original “ugly” website. As we begin building your website you will be able to see all the changes that you make here, while your website visitors and clients will only see the coming soon page.
When you are finished building your website and you are 100% happy with its design, simply deactivate the coming soon page plugin, and your website visitors will see your completed site.
Conclusion
A coming soon page is an awesome option if you would like to create a professional landing page that your website visitors will see while you are building your small business website behind the scenes. It gives you the time you need to build your website without feeling pressurized or rushed. It also gives you the opportunity to collect client email addresses before you actually launch your website. Win-Win!
If you have followed along with this tutorial I would love to know how your coming soon page turned out! Let me know in the comments section below 🙂