![]()
How To Change Your WordPress Page Layout And Design In 5 Steps
Whether you are building a small business website, an online store, or a personal blog, it’s really important that you use a WordPress theme that allows you to easily customize the look and feel of your WordPress pages! Luckily, by using WordPress and the Blocksy theme, it really is easy to customize your page layout and design with just a few clicks!
In this short tutorial, I’m going to show you how to quickly and easily change the page layout for all the pages on your website. I’ll also show you how to change the page layout and design for individual pages.
Let’s jump right in!
How To Edit The Page Layout Using The Blocksy Theme
If you have been following along with my tutorials you will know that we have been using the Blocksy theme to build a website from scratch. The Blocksy theme is awesome because its free version has so many amazing options that rival even paid themes!
If you would like to give the Blocksy theme a try then check out this article where I show you how to install it and select a starter website to give you a jump start on your website design: Step-By-Step Guide To Installing The Blocksy WordPress Theme: Beginners Tutorial
Step 1 – Open The WordPress Theme Customizer
To open the theme customizer, you will need to log into the WordPress admin panel where you should choose “Appearance” > “Customize“.
Step 2 – Select A Page From The Customizer Preview Window
When the theme customizer opens, scroll down toward the bottom of the page where you will find the legal pages that we created in the last tutorial. Click on one of the pages to open it in the customizer preview window.
Related: The WordPress Customizer: A Quick Overview For Beginners
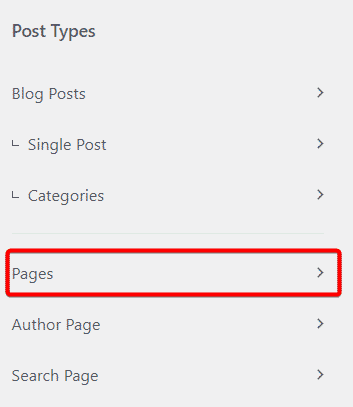
Step 3 – Select The Pages Menu
When your page opens, you will need to select the Pages menu item on the left-hand side of the page.
Step 4 – Customize The Page Title
When the “Pages” dashboard opens you will see that there are quite a few options there that allow you to change your layout. And most of these are very similar to the post layout options.
Let’s work through each page layout option!
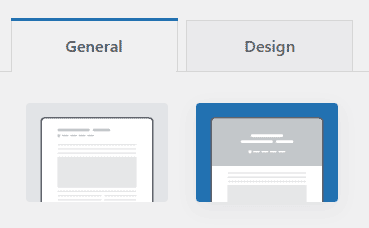
Page Title
The “Page Title” dashboard has two tabs – General and Design.
The General tab allows you to change the page layout while the Design tab allows you to change the fonts and colors of your page title, excerpt, and breadcrumbs along with a couple of other design options.
Layout
In the “General” tab, your first option is to choose the page title layout. You have two options:
Type 1 – Type 1 gives you a classic layout that is clean and modern. You can add a featured image to this layout if you would like to.
Type 2 – Type 2 encases your title in a box where you will be able to use a background image or color to make your title stand out. If you choose Type 2 you will have a few more customization options.
Elements
In the “Elements” section, you will be able to choose which title elements are visible or hidden. You will also be able to change the order in which the elements are displayed.
For an overview of how the element section works, check out my full tutorial about how to edit the layout and design of WordPress posts.
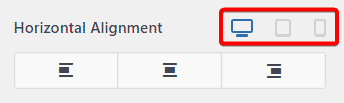
Horizontal Alignment
Here you can decide whether you would like your title aligned to the left, center, or right of the page.
You can also choose how you would like the title to be displayed on tablet and mobile.
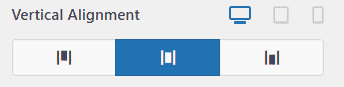
Vertical Alignment
If you are using the Type 2 title design you will have a vertical alignment option. With this option, you can choose whether you would like your title displayed at the top, middle, or bottom of the title box.
Container Background Image
If you are using the Type 2 title design, you will be able to choose whether you would like a background image displayed. You will be able to choose between displaying:
- Your featured image.
- A custom image that you can upload from the media library.
- No image.
Image Size
Here you can set your image size so that your images fit and are dislayed perfectly.
Image Parallax
A parallax effect is created when the background image scrolls slower than the foreground content. Here you can choose whether you would like to enable this effect and also which devices it should be active on.
Container Min Height
You can use this slider to set the height for your title box container.
Step 5 – Customize The Page Layout & Structure
There are a couple of customization options in this section that you can choose from.
These options will change depending on whether you have chosen to use the Type 1 or Type 2 title layouts or whether you would like to use a featured image.
Page Structure
In the “Page Structure” section, you have four layout options to choose from:
- Narrow width
- Normal width
- Left sidebar
- Right sidebar
Content Area Style and Vertical Spacing
The next two options allow you to set the area style and spacing for desktop, tablet, and mobile.
Featured image
The “Featured Image” option is used if you select the Type 1 title layout and would like to include a featured image on the page.
Clicking on the featured image option will open up a dashboard where you will be able to choose the image size and width. You will also be able to decide if you would like the image displayed above or below the page title.
Share Box
The “Share Box” option allows you to choose whether you would like to include a social sharing box on your page. If you click on the share box option it will open up a dashboard where you will be able to customize the social share options.
Page Elements
The “Page Elements” option only has one option – Comments. If you would like website visitors to add comments to your pages then you can select this option.
How To Customize The Page Layout For Individual Pages
There might be times when you would like your page layout to change for a specific page. For example, you might want your “Services” page to have a featured image but your “Terms and Conditions” page to just have a page title with no image.
You can easily do this directly from the Gutenberg editor.
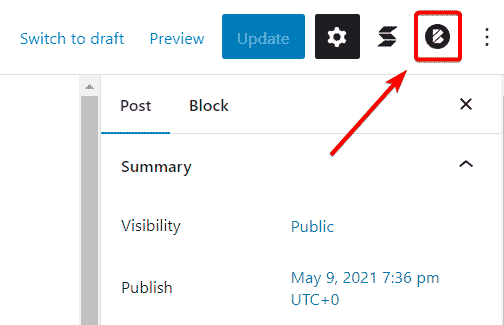
Open up a page from the WordPress admin dashboard by clicking “Pages” > “All Pages“. Select and click on a page you would like to edit.
When the page opens, click on the Blocksy Settings button.
From the Blocksy setting dashboard you will be able to choose an individual page layout (narrow width, normal width, left sidebar, and right sidebar) as well as whether you would like to disable the following page elements:
- Featured Image
- Share Box
- Header
- Footer
In the “Design” tab you will also be able to change the page background color.
Conclusion
WordPress and the Blocksy theme make it really easy to customize your page layouts. And with all the amazing options available in the free Blocksy theme option, getting the perfect page design doesn’t have to break the bank!